Academic Technologies Contact Information
For in-classroom or urgent assistance, call Academic Technologies at: 919-730-9108.
For non-urgent requests, Canvas assistance, or help with digital learning tools at KFBS, email us at: itacademictechnologies@kenan-flagler.unc.edu.
For additional information on assistance and services from the Academic Technologies team, please visit the Academic Technologies Services Page.
For non-urgent requests, Canvas assistance, or help with digital learning tools at KFBS, email us at: itacademictechnologies@kenan-flagler.unc.edu.
For additional information on assistance and services from the Academic Technologies team, please visit the Academic Technologies Services Page.
Bell Hall Classroom Overview
Bell Hall’s updated teaching spaces are thoughtfully designed to help instructors present content with flexibility and confidence. Whether you’re conducting a straightforward lecture or facilitating a complex, interactive session using multiple sources and video calls, Bell Hall classrooms provide the tools you need for effective instruction.
Explore the full feature list below to discover how Bell Hall’s classrooms can support your teaching. For step-by-step assistance, visit the Classroom Guides and Instructions.
Explore the full feature list below to discover how Bell Hall’s classrooms can support your teaching. For step-by-step assistance, visit the Classroom Guides and Instructions.
Classroom Features
- ADA-compliant lecterns with vertical controls for accessibility
- Two confidence monitors on the lectern: a standard monitor and a QOMO touch screen panel for easy annotation
- USB ports and power outlets for connecting accessories
- HDMI cable with attached adapters to support most video output connections on user devices
- Dedicated document camera connection (please contact Academic Technologies in advance to request a document camera)
- Two front projectors, side displays, and rear displays for versatile content presentation
- Flexible content routing from multiple sources to any display in the room
- Breakout mode for small group collaboration, allowing students to connect their own devices to monitors around the room
- In-room microphones and speakers for clear audio throughout the space
- In-room cameras for lecture capture and video conferencing, available in all teaching spaces upon instructor request
Classroom Guides and Instructions
Touch Panel/Console
The lectern touch panel puts classroom control at your fingertips, helping you run your class with confidence. The directions below will guide you through selecting content sources, routing them to room displays, and managing essential screen and audio controls for a seamless teaching experience.Routing to Room Displays
Bell Hall classrooms offer flexible display options, allowing you to send content from any source to any or all destination displays throughout the room. This feature makes it easy to customize your teaching environment for presentations, group work, or lecture capture.
Follow these steps to route sources to the desired displays:
Follow these steps to route sources to the desired displays:
Instructions
-
Access the Main Routing Screen
- Activate the touch panel to navigate to the main screen where display routing options are available.
-
Select Your Source
- Choose the content source you wish to display (e.g., PC, Laptop, Wireless Presentation, DocCam).
-
Choose Your Destination Display(s)
- Tap the display(s) where you want to send your selected source (e.g., left or right projector screens, side and rear monitors).
- To send your source to all displays at once, tap the All Displays button.
-
Route to Podium Monitors
- To display content on the left and right podium monitors, route each monitor individually by selecting the desired source and then select the Left and Right Podium Monitor on the touch panel.
-
Set Room Audio Source
- Select your preferred audio source for room use and Panopto lecture capture. The default audio source is the PC, but you may choose another if needed.
Helpful Tips
- You can mix and match sources and displays to suit your teaching style and classroom activities.
- Remember to individually route sources to the podium monitors for instructor convenience.
- Confirm your audio source selection to ensure sound is captured for both in-room use and Panopto recordings.
Watch the Video
For a visual walkthrough, watch our instructional video on routing sources to room displays in Bell Hall classrooms.Classroom PC
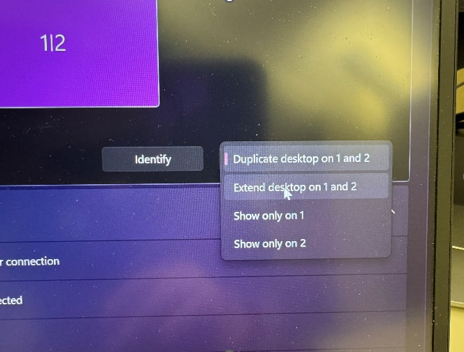
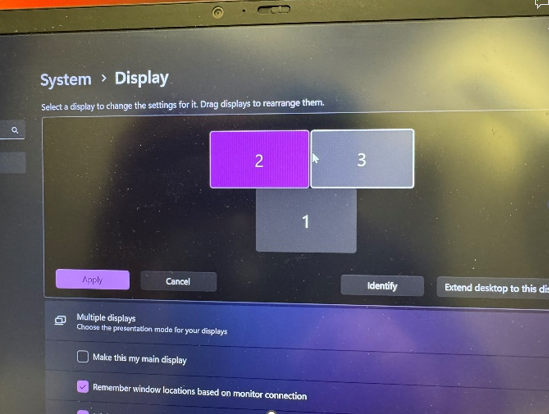
A new feature in Bell Hall classrooms is the extended desktop monitor. This allows you to use a second display, which can be routed to any room display for flexible teaching options.
Follow these steps to use and manage the extended desktop monitor in the classroom:
Follow these steps to use and manage the extended desktop monitor in the classroom:
Instructions
-
Log In to the Classroom PC
- Use your Kenan-Flagler username and password to access the classroom computer.
-
Choose Your Content Source
- On the classroom touch panel, select either PC Main (your primary desktop) or PC Extended (your second desktop).
-
Route to Desired Display
- Use the touch panel to send your selected desktop (main or extended) to any room display, such as the front projector, side monitors, or rear monitors.
-
Use Extended Desktop Features
- Move windows, presentation materials, or applications between your main and extended desktops for more dynamic presentations.
- Display different content on multiple screens to support varied teaching activities.
-
Switch Between Displays as Needed
- You can change which desktop is shown on each display at any time using the touch panel controls.
Helpful Tips
- The extended desktop is ideal for showing presentation slides on one screen while keeping notes or other materials on the second.
- To move a window to the extended desktop, drag it off the edge of your main screen.
- If a display does not show your chosen desktop, check your touch panel routing and ensure the correct source is selected.
Watch the Video
For a step-by-step demonstration, watch our instructional video on using the extended desktop monitor in Bell Hall classrooms.Adjusting Room Controls: Screens, Audio, and Lights
Bell Hall classrooms feature an intuitive touch panel that lets you manage audio, lighting, and display settings to create the ideal teaching environment.
Follow these steps to adjust room controls using the touch panel:
Follow these steps to adjust room controls using the touch panel:
Instructions
-
Locate the Controls on the Touch Panel
- On the right side of the touch panel, you’ll find controls for room audio, lights, display settings, and general volume.
-
Adjust Audio Settings
-
Tap the Audio button to:
- Change or mute room audio levels.
- Adjust ceiling microphone levels.
- Set levels for wireless handheld or lapel microphones.
- Use the Voice Lift feature for enhanced room amplification—helping students hear each other clearly.
- Mute Voice Lift with the Voice Lift Mute button at the bottom of the screen.
-
Tap the Audio button to:
-
Control Room Lighting
- Tap the Lights menu to customize lighting in the classroom.
- In rooms with windows, use the automated shade controls available in this menu.
-
Manage Display Settings
-
Tap the Display Settings menu to:
- Turn displays on or off.
- Blank content on screens around the room for privacy or focus.
-
Tap the Display Settings menu to:
-
Exiting Settings
- Press the red X in the corner of any settings page to return to the main screen.
Helpful Tips
- Adjust audio levels for microphones and speakers to ensure everyone can hear clearly.
- Use Voice Lift for additional amplification, especially during class discussions.
- Automated shades help control glare and lighting for optimal visibility.
- Blank screens when you want attention focused away from projected content.
Watch the Video
For a visual walkthrough, watch our instructional video on using room controls in Bell Hall classrooms.Camera Controls
Bell Hall classrooms are equipped with four high-resolution cameras to support flexible recording and streaming options. The presenter-right camera provides a default podium shot that is always included in Panopto recordings and cannot be adjusted, ensuring the presenter is visible for requested recordings. The other three cameras in the classroom can be controlled and customized to suit your teaching needs.
Camera controls can be adjusted for Panopto recordings or Zoom meetings. Follow these steps to preview, control, and customize camera views in your classroom:
Camera controls can be adjusted for Panopto recordings or Zoom meetings. Follow these steps to preview, control, and customize camera views in your classroom:
Instructions
-
Access Camera Controls
- On the touch panel, tap the Camera Preview/Control button to access camera controls.
-
Select and Route a Camera
- Choose which of the three controllable cameras you want to use.
- Route the selected camera feed to a display (like PC Main) to preview the camera angle.
-
Adjust Camera Position
- Use the touch panel controls to pan, tilt, and zoom the selected camera for optimal coverage.
- Select from Presets One through Four for common camera views or set your own.
-
Enable Camera Auto-Tracking (Optional)
- A new feature in Bell Hall classrooms is camera auto-tracking.
- By default, auto-tracking is disabled. To enable it, select the camera and turn on auto-tracking through the touch panel controls.
Helpful Tips
- Use camera presets for quick access to common views.
- Auto-tracking is helpful for recording moving presenters; enable it only when needed.
Watch the Video
For a visual demonstration, watch our instructional video on camera controls in Bell Hall classrooms.Connecting Laptop
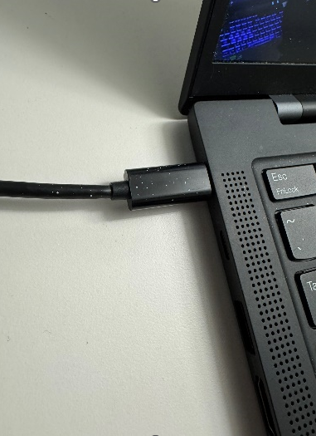
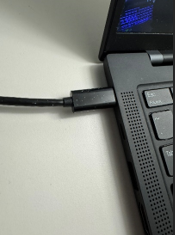
Bell Hall classrooms make it easy to connect your laptop for presentations and interactive sessions. The control console provides labeled HDMI and USB cables, as well as an adapter ring to accommodate different devices.
Follow these steps to connect your laptop and share content in the classroom:
Follow these steps to connect your laptop and share content in the classroom:
Instructions
-
Connect the Cables
- Locate the HDMI and USB cables labeled “Laptop” at the control console.
- Plug the HDMI cable into your laptop.
- Plug the USB cable into your laptop (optional, but recommended for audio and camera control).
- Use the provided adapter ring if your laptop requires a different port type.
-
Understanding the Cables
- The HDMI cable is required to display your laptop content on classroom screens.
- The USB cable enables you to use in-room audio and camera controls for applications like Zoom and Teams, but is not required for basic content display.
-
Activate and Route Laptop Source
- Activate the classroom system by tapping the touch panel.
- Select Laptop as your source on the touch panel.
- Route the laptop source to your desired displays (e.g., projector, monitors).
-
Set Up Room Audio (Optional)
- If you want the room audio to play from your laptop (for videos or conferencing), route the Laptop source to the Room Audio on the touch panel.
Helpful Tips
- If your laptop does not have an HDMI or USB port, use the provided adapter ring.
- For Zoom or Teams sessions, connect both HDMI and USB cables for best results.
- Check if your laptop is set to duplicate or extend the display if your content does not appear.
Watch the Video
For a visual walkthrough, watch our instructional video on connecting your laptop in Bell Hall classrooms.AirMedia/Wireless Presentation
Bell Hall classrooms support wireless presentation through AirMedia, allowing you to share content from PC, Apple, and Android devices without cables.
Follow these steps to connect your device and present wirelessly:
Follow these steps to connect your device and present wirelessly:
Instructions
-
Select Wireless Presentation Source
- On the classroom touch panel, choose Wireless Presentation as your source.
- Route the wireless presentation to your desired display(s).
-
Connect Your Device
- Follow the on-screen instructions displayed in the classroom.
- On your personal device, open your preferred browser and navigate to the provided presentation URL.
-
Generate and Enter Connection Code
- After reaching the presentation URL, follow the on-screen prompts to generate a connection code.
- Enter the code as instructed to pair your device with the classroom display.
-
Begin Presenting
- Once connected, your device’s screen will automatically project to the selected display(s).
-
Set Up Room Audio (Optional)
- If you want the room audio to play from your device (for videos or conferencing), route the Wireless Presentation source to the Room Audio on the touch panel.
Helpful Tips
- If you experience connection issues, refresh your browser or restart your device.
- For optimal audio experience, remember to route room audio from the Wireless Presentation source.
Watch the Video
For a step-by-step demonstration, watch our instructional video on using AirMedia wireless presentation in Bell Hall classrooms.Breakout Mode
Breakout Mode allows you to divide your class into small groups for collaborative activities. Each group can display content from their own laptop onto a dedicated side monitor, making it easy to share ideas and work together in real time.
Follow these steps to set up and use Breakout Mode in the classroom:
Follow these steps to set up and use Breakout Mode in the classroom:
Instructions
-
Activate Breakout Mode
- On the classroom touch panel, select Break Out (Wallplate).
-
Connect Student Laptops
- Each group should use an HDMI cable to connect their personal laptop to the wallplate located below a side monitor.
-
Collaborate in Groups
- The content from each connected laptop will appear on the corresponding side monitor.
- Groups can work together, share screens, and collaborate in real time.
-
Return to Main Session
- To end Breakout Mode, re-select the “Break Out” option on the touch panel to return to the desired classroom configuration.
Helpful Tips
- Ensure all laptops have an HDMI port or compatible adapter.
- If a display does not show the laptop screen, check the HDMI connection and confirm the laptop is set to duplicate or extend the display.
Watch the Video
For a visual walkthrough, watch our instructional video on setting up and using Breakout Mode.Support
If you need assistance during your class, support is just a tap away. The Bell Hall touch panel includes a convenient Help button to connect you with our support team.
Follow these steps to request classroom assistance:
Follow these steps to request classroom assistance:
Instructions
-
Access the Support Number
- On the touch panel, tap the Help button at the bottom left of the screen to display the support phone number.
-
Contact Support
- Use your phone to call the support number for immediate assistance from our Academic Technologies team.
Helpful Tips
- The Help button is available at all times during your class session.
- For non-urgent issues or follow-up questions, you may also contact Academic Technologies at itacademictechnologies@kenan-flagler.unc.edu.
Watch the Video
For a quick overview, watch our instructional video on accessing classroom support in Bell Hall.Classroom Tools and Technology
Bell Hall’s classroom tools and technology are designed to enhance your teaching experience and support a wide range of instructional activities. The guides below will help you make the most of these resources, from presenting and recording content to facilitating student engagement and accessibility, ensuring your class runs smoothly and effectively.Classroom Clickers (Presentation Remotes)
Bell Hall classrooms are equipped with handheld clickers to support seamless presentation navigation for instructors and presenters.
Instructions
-
Locating and Using the Clicker
- Each classroom includes a handheld clicker, which is paired with the console PC.
-
Navigating Slides:
- Use the green and red arrow buttons on the clicker to move forward or backward through your presentation slides.
-
Laser Pointer:
- The clicker also features a laser pointer button, allowing you to highlight information on your slides during your presentation.
-
Keep the clicker in the classroom:
- Each clicker is paired with a specific classroom. Please ensure that the clicker remains in the room to which it is assigned and does not leave the classroom.
Helpful Tips
- Make sure the clicker is paired with the console PC before your presentation begins.
- Use the laser pointer to draw attention to key points or details on your slides.
- If you experience any issues with the clicker, contact Academic Technologies through the Help button on the touch panel.
Watch the Video
For a visual demonstration, watch our instructional video on using classroom clickers in Bell Hall.Panopto Class Recordings
Bell Hall classrooms are equipped to support lecture capture through Panopto, making it easy to record and share your class sessions.
Request Scheduled Section Recordings
To request a scheduled section recording, please fill out the following form at least two business days in advance of the requested recording date: https://myke.kenan-flagler.unc.edu/client/dashboard?m=MySupportRequests&t=course%20recordingsManaging Recordings During Class
Use the classroom touch panel to control your recording session and camera views. For detailed instructions on adjusting camera settings, please refer to the Camera Controls section.Pause, Extend, and Stop Recordings
-
Pause Recording:
If you need to temporarily pause the recording (for a break or private discussion), tap the Pause button on the touch panel. Tap the Pause button again to resume recording. -
Extend Recording:
If your class runs longer than scheduled, tap the Extend button to add 5 more minutes to your recording session. -
Stop Recording:
To end your recording, tap the Stop button on the touch panel. The recording will still be saved in your associated Canvas course and accessible to students.
Helpful Tips
- For assistance with Panopto recordings, please contact Academic Technologies at ITAcademicTechnologies@kenan-flagler.unc.edu.
- Devices and screens will be recorded even if they are blanked.
- Even if the touch panel is not activated, the classroom audio will still be recorded if a recording is scheduled in Panopto.
PowerPoint
Follow these steps to set up and present your PowerPoint using the extended screen feature in the classroom:
Instructions
-
Activate the Touch Panel
- Activate the classroom system by tapping the touch panel.
- Select the PC source.
-
Route to Desired Displays
- Use the touch panel to choose which displays you want to use (e.g., front projector, side monitors, etc.).
- To utilize the extended desktop monitor, select the PC Extended display and route it to the desired podium monitor.
-
Log In to the Classroom PC
- Enter your Kenan-Flagler username and password to access the computer.
-
Open Your Presentation
- Launch PowerPoint or your preferred presentation software.
- Open the file you’d like to present.
-
Set Up Presenter View
- Navigate to the Slide Show tab in PowerPoint.
- Select Presenter View if you want to see your notes and upcoming slides on the extended monitor.
-
Start Presenting
- Begin your presentation. Your slides will appear on the main display for your audience, while your notes and controls will be visible on the extended monitor.
Helpful Tips
- Presenter View allows you to see notes and upcoming slides privately while your audience sees only the current slide.
- Make sure your displays are routed correctly before starting your presentation.
- If you need to switch displays or sources during your session, you can do so at any time using the touch panel.
Watch the Video
For a visual walkthrough, watch our instructional video on using the extended screen with PowerPoint.Video Conferencing: Configuring Classroom for Zoom
Follow these steps to configure the classroom for video conferencing with Zoom:
Instructions
-
Set Up Room Displays and Audio
- Start by routing the console PC sources to your preferred displays using the touch panel.
- Be sure to select and route the room audio from your desired source.
-
Access Zoom on the Classroom PC
- Log in to Zoom on the classroom PC. (If authentication is required, follow the on-screen prompts.)
- Alternatively, you can launch Zoom directly from the Zoom tab in your Canvas course.
- Start your Zoom meeting.
-
Confirm and Adjust Video Source
- In the meeting preview window, check your video feed by ensuring your video is unmuted and that the correct camera is active.
- To change the camera source, click the video dropdown menu on the bottom right, then select your preferred camera.
- You can also change cameras using the Camera Preview/Control button on the classroom touch panel. See the Camera Controls section for more instructions on changing camera views.
-
Confirm and Test Audio Source
- In the meeting preview window, click the audio dropdown menu on the bottom left and select Test Microphone and Speaker.
- Cycle through available speakers until you hear the test sound, then select your preferred speaker.
- Repeat the process for the microphone. Speak during the test to ensure the microphones detect and transmit your audio.
- After confirming your speaker and microphone selections, click End Test to continue and start your meeting.
-
Begin Your Video Conference
- You are now ready to begin your Zoom session and share any desired content.
Helpful Tips
- For camera adjustments during your meeting, use either the Zoom controls or the touch panel camera button.
- Make sure to test both speaker and microphone before starting your session to avoid audio issues.
- If you need additional help with Zoom setup or troubleshooting in the classroom, please contact Academic Technologies through the Help button on the touch panel.
Watch the Video
For a visual walkthrough, watch our instructional video on configuring the classroom for Zoom video conferencing.Video Conferencing: Configuring Classroom for Teams
Follow these steps to configure the classroom for video conferencing with Microsoft Teams:
Instructions
-
Set Up Room Displays and Audio
- Start by routing the console PC sources to your preferred displays using the touch panel.
- Be sure to select and route the room audio from your desired source.
-
Access Microsoft Teams on the Classroom PC
- Open your Microsoft Teams meeting on the classroom PC.
- If prompted, allow Teams to access the audio and video devices. Confirm the correct camera and microphone are selected, and click “Allow while visiting the site” to allow access to the PC camera and microphone.
-
Confirm and Adjust Video Source
- In the meeting preview window, check your video feed by ensuring your video is unmuted and that the correct camera is active.
- To change the camera source, click the video dropdown menu on the bottom left and select your preferred camera.
- You can also change cameras using the Camera Preview/Control button on the classroom touch panel. See the Camera Controls section for more instructions on changing camera views.
-
Confirm and Test Audio Source
- In the meeting preview window, select the Computer Audio option and open the microphone dropdown menu.
- Test the selected microphone by speaking to ensure your audio is being transmitted. Cycle through the available audio outputs until you find your preferred selection.
- Once you’ve confirmed your microphone selection, click Join Now to start your meeting. If prompted, click Allow for Teams to manage windows on your display.
-
Begin Your Video Conference
- You are now ready to begin your Teams session and share any desired content.
Helpful Tips
- For camera adjustments during your meeting, use either the Teams controls or the touch panel camera button.
- Make sure to test both speaker and microphone before starting your session to avoid audio issues.
- If you need additional help with Teams setup or troubleshooting in the classroom, please contact Academic Technologies through the Help button on the touch panel.
Watch the Video
For a visual walkthrough, watch our instructional video on configuring the classroom for Teams video conferencing.Document Cameras
Document cameras are available by request through Academic Technologies. Follow these steps to set up and use the DocCam:
Instructions
-
Request a Document Camera
- Contact Academic Technologies in advance to request a document camera for your classroom session.
-
Activate and Power Up the Document Camera
- Turn on the document camera using its power button.
-
Select the DocCam Source
- On the classroom touch panel, choose the DocCam as your source.
-
Route to Desired Display
- Use the touch panel to route the DocCam output to your chosen display(s) (e.g., projector, monitors).
-
Adjust Zoom and Focus
- Use the zoom and focus controls located on the document camera to clearly display your materials.
Helpful Tips
- Make sure the document camera is positioned so your materials are clearly visible.
- Adjust zoom and focus as needed for clarity.
- If you need assistance, contact Academic Technologies for support.
Watch the Video
For a step-by-step demonstration, watch our instructional video on setting up and using the document camera.Assisted Listening Devices
Bell Hall classrooms are equipped with personal listening devices to support individuals who need audio assistance during class sessions.
Instructions
-
Locating the Device
- Each classroom includes a personal listening device, which can be found at the teaching console. The device comes with headphones and an adapter featuring a 3.5 mm connection port, allowing you to use your own headphones if preferred.
-
Using the Device
- Power On: Locate the power button on the end of the device and press it to turn the unit on.
- Connect to Room Audio: Once powered on, the device will automatically connect to the room’s audio feed.
- Adjust Volume: Use the volume buttons on the front of the device to set a comfortable listening level. The LED display will show both battery status and current volume level.
-
After Use
- Return and Recharge: When you’re finished, please return the device to the teaching console and ensure it is placed on the charger so it is ready for the next user.
Helpful Tips
- If you prefer, you can use your own headphones with the included 3.5 mm adapter.
- Check the LED display for battery and volume information before use.
- For assistance or troubleshooting, contact Academic Technologies through the Help button on the touch panel.
Watch the Video
For a step-by-step demonstration, watch our instructional video on using assisted listening devices in Bell Hall classrooms.Handheld and Lavalier Microphones
Bell Hall classrooms are equipped with rechargeable handheld and lavalier microphones to support clear audio for instructors and presenters.
Instructions
-
Locating the Microphones
- Rechargeable handheld and lavalier microphones are available in every classroom and can be found at the teaching console.
-
Using the Microphones
- Power On: Each microphone has a power switch on the device. Slide or press the switch to turn the microphone on.
- Adjust Levels and Muting: Use the Audio menu on the classroom control panel to adjust microphone volume levels or mute the microphones as needed.
-
After Use
- Return and Recharge: After your session, please return both microphones to their designated charging location at the teaching console to ensure they are ready for the next user.
Helpful Tips
- Always check that the microphone is powered on and the volume is set appropriately before starting your session.
- Microphone settings, including mute and volume, can be managed at any time from the Audio menu on the touch panel.
- For assistance or troubleshooting, contact Academic Technologies through the Help button on the touch panel.